Buzz, Woody, and the rest of Andy’s toys are back in a brand new adventure in Disney’s Toy Story 4. To celebrate the theatrical release, make Toy Story Oreos.
This post may contain affiliate links. Please see my Disclosure Policy for more information.
These Toy Story Oreos feature three favorite characters from the Toy Story franchise: Buzz Lightyear, Woody, and the aliens. Yes, I’m counting the aliens at one. Plus, Bo Peep is back with a sassy look. We also meet a collection of new characters like Ducky and Bunny and a DIY art project turned toy named Forky.

When Bonnie takes the toys on her family’s road trip, Woody ends up on an unexpected detour that includes a reunion with his long-lost friend Bo Peep, whose adventurous spirit and life on the road belie her delicate porcelain exterior. Woody and Bo are worlds apart when it comes to life as a toy, and they soon realize that’s the least of their worries.

Ingredients
For Woody:
1/3 (15.35 ounce) package Oreo Chocolate Sandwich Cookies
1/2 (12 ounce) package red candy melts wafers
1 (12 ounce) package yellow candy melts wafers
For Buzz Lightyear:
1/3 (15.35 ounce) package Oreo Chocolate Sandwich Cookies
1 (12 ounce) package white candy melts wafers
1/3 (12 ounce) package green candy melts wafers
1/3 (12 ounce) package purple candy melts wafers
2 tablespoons blue candy melts wafers
For Aliens:
1/3 (15.35 ounce) package Oreo Chocolate Sandwich Cookies
1 (12 ounce) package green candy melts wafers
Candy eyeballs
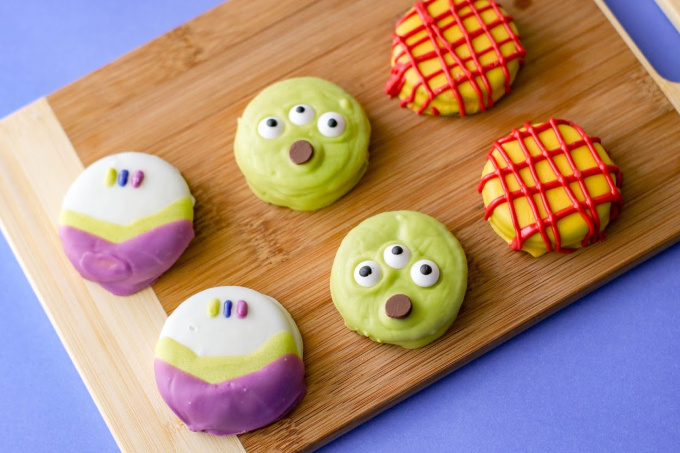
Instructions
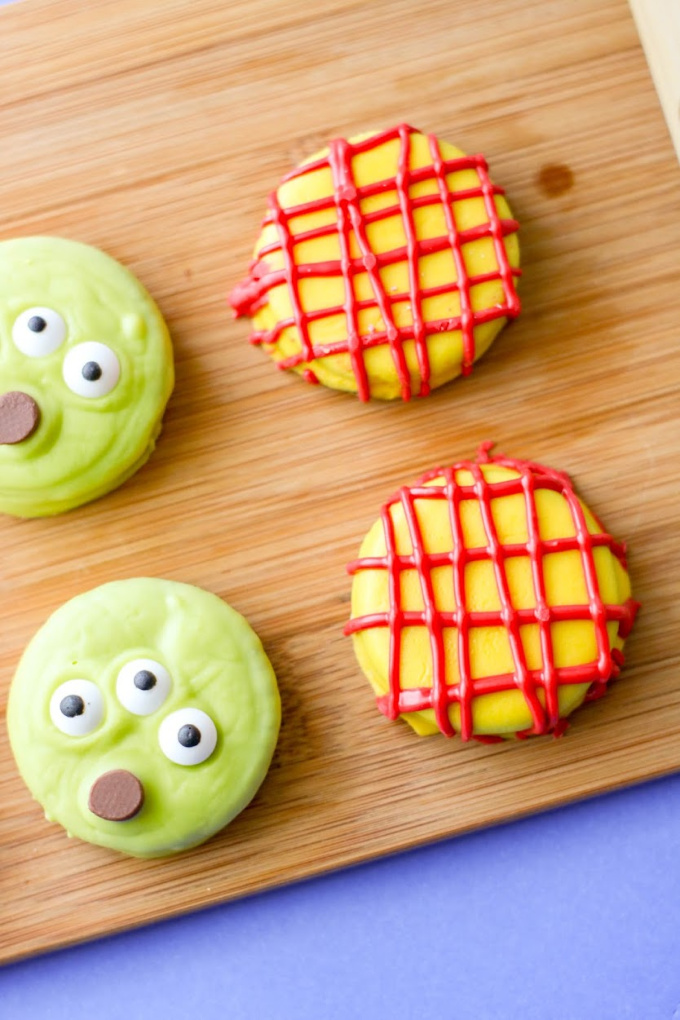
For Woody:
1. Line a baking sheet with waxed paper.
2. Melt yellow candy coating according to package directions. If the candy is too thick to pour, add 1 teaspoon coconut oil or vegetable shortening. Stir well. Do not add water. You can add up to 1 tablespoon of coconut oil per bag of candy wafers.
3. Dip each cookie into melted candy. Remove cookie, tapping gently against the side of the bowl, allowing excess candy to return to the bowl. If air bubbles form, pop them with a toothpick. Place the cookie onto the waxed paper. Allow to set completely before proceeding to the next step. To speed the process, cookies can be refrigerated or placed in the freezer in a single layer.
4. Melt red candy coating according to package directions. Transfer melted candy to a piping bag or zip top freezer bag with the corner snipped. Create solid lines across each cookie in a perpendicular pattern.
5. Allow cookie to set completely at room temperature or refrigerate for faster results. Store in an airtight container at room temperature.

For Buzz Lightyear:
1. Line a baking sheet with waxed paper.
2. Melt white candy coating according to package directions. If the candy is too thick to pour, add 1 teaspoon coconut oil or vegetable shortening. Stir well. Do not add water. You can add up to 1 tablespoon of coconut oil per bag of candy wafers.
3. Dip each cookie into candy melts. Remove cookie, tapping gently against the side of the bowl, allowing excess candy to return to the bowl. If air bubbles form, pop them with a toothpick. Place the cookie onto the waxed paper. Allow to set completely before proceeding to the next step. To speed the process, cookies can be refrigerated or placed in the freezer in a single layer.
4. Melt green candy coating according to package directions. Dip each cookie into the melted candy about halfway. Return to wax paper and allow to set completely.
5. Melt purple candy coating according to package directions. Dip each cookie into the melted candy about halfway up the green area. Return to wax paper and allow to set completely.
6. Using a toothpick, apply a tiny amount of candy melts in three colors (green, blue, purple) to the cookie to represent Buzz’s buttons.
7. Allow cookie to set completely at room temperature or refrigerate for faster results. Store in an airtight container at room temperature.

For Aliens:
1. Line a baking sheet with waxed paper.
2. Melt green candy coating according to package directions. If the candy is too thick to pour, add 1 teaspoon coconut oil or vegetable shortening. Stir well. Do not add water. You can add up to 1 tablespoon of coconut oil per bag of candy wafers.
3. Dip each cookie into candy melts. Remove cookie, tapping gently against the side of the bowl, allowing excess candy to return to the bowl. If air bubbles form, pop them with a toothpick. Place the cookie onto the waxed paper.
4. Immediately press three eyes into place.
5. Allow cookie to set completely at room temperature or refrigerate for faster results. Store in an airtight container at room temperature.
These Oreos are so much fun, aren’t they?!? They’d be perfect treats for a Toy Story birthday party or special treat to celebrate with your favorite Lost Toy.
Watch how to make Toy Story Oreos here:
Want to share your Oreos online? Check out this post with the Best Pixar Quotes for Instagram.
Toy Story 4 comes to theaters June 21, 2019. You can follow along on Facebook, Twitter, Instagram, and YouTube.
3 Comments
Leave a Reply Cancel reply
This site uses Akismet to reduce spam. Learn how your comment data is processed.






This is such a cute idea! I wouldn’t have thought about making Toy Story Oreos if it wasn’t for this post, it’s definitely something I would love to do with my nieces!